
Getty Images/iStockphoto
How to create an EC2 instance from the AWS Console
AWS has made launching EC2 instances an easy task, but there are still many steps to the result. Learn how to successfully create an EC2 instance from AWS Console.

Launching EC2 instances is one of the most basic tasks AWS cloud users perform. Although AWS makes it easy to complete the process, there are still many steps involved.
While there are multiple ways to create an EC2 instance, this tutorial walks through these steps for the AWS Console as well as provides input on important considerations and key concepts.
The AWS Console, alternatively called the AWS Management Console, is a GUI to provision and manage resources and deployments on AWS. It is a collection of management consoles for the various services that make up the AWS cloud.
Follow these steps to successfully create an EC2 instance from the AWS Console.
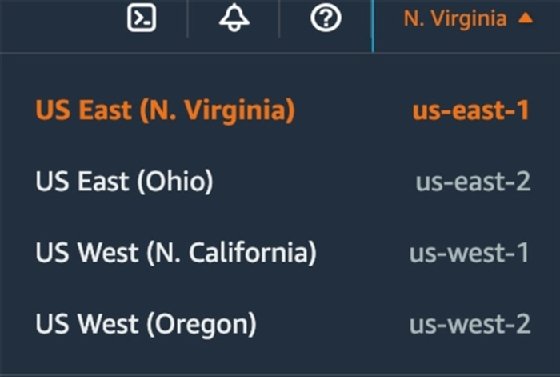
Step 1. Select a region
One of the most important steps is to select the desired AWS region. Select a region from the top navigation bar of the AWS Console.
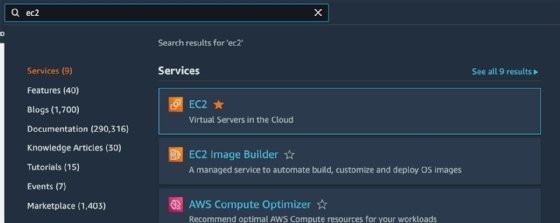
Step 2. Navigate to the EC2 Console
With an AWS region selected, go to the EC2 Console. From the same landing page, search for EC2, as shown in Figure 1. The landing page in the management interface should display EC2 among the most used services in the account.
Once at the EC2 Console, from the left navigation menu, choose the Instances option.
Under Instances is a list of the EC2 instances deployed in the account. There is also a Launch instances button on the top right section of this page. That button directs to the EC2 instance launch flow.
Step 3. Specify Name and Tags for the EC2 instance
Specify a Name tag for the EC2 instance and add any relevant tags. This helps to easily identify the EC2 instance in the console after it's launched. A consistent tagging strategy across AWS resources is an operational best practice. Therefore, it is important to appropriately tag the new instance.
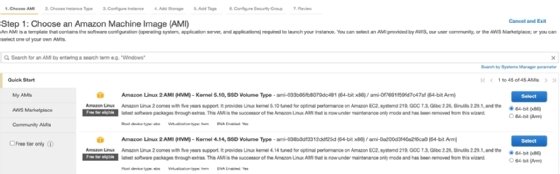
Step 4. Specify an AMI for the EC2 instance
An EC2 instance is a virtual server deployed in the AWS cloud. The first server-specific configuration to choose is the Amazon Machine Image (AMI), a base server image stored in the cloud as shown in Figure 3. It contains the OS, preinstalled software and data included in the EC2 instance when it launches.
AWS offers a set of AMIs for OSes, including the following:
- Amazon Linux.
- Ubuntu.
- Apple macOS.
- Red Hat Enterprise Linux.
- Microsoft Windows.
AWS Marketplace allows external vendors to publish their own AMIs and make them available to AWS customers.
Developers can also create their own AMIs. Unique AMIs can customize any of the available images with preinstalled software and files or other elements. Developers can expose an AMI privately -- only to a configurable list of AWS accounts -- or publicly for others to use.

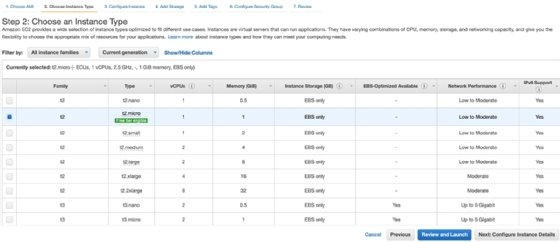
Step 5. Choose an instance type
After selecting the AMI, choose an instance type. There are over 750 of types of EC2 instances in instance families. They are grouped by characteristics in terms of compute, memory, storage and networking resources. Most instances are billed by the minute. Pricing is proportional to the resources allocated to it, such as memory, vCPUs, Elastic Block Store/solid-state drive (SSD) storage and the network's data throughput rate.
To select an EC2 instance, know the application infrastructure requirements and the right EC2 instance type to meet them. Under-provisioned EC2 instances encounter performance problems, while over-provisioned instances result in an unnecessarily high bill. Clicking on Compare Instance Types displays a screen with detailed specifications for each instance type.
Step 6. Enable SSH access with a key
The next step is to create an EC2 key or select an existing one. The key is used to enable Secure Shell (SSH) access into the EC2 instance.
With Windows instances, the private EC2 key helps generate an admin password to access the instance. AWS stores a copy of the public key inside the EC2 instance. Users keep the private key.
It's the developer's responsibility to store the generated key file in a secure location, given that this file enables someone to access the EC2 instance and run commands in it.
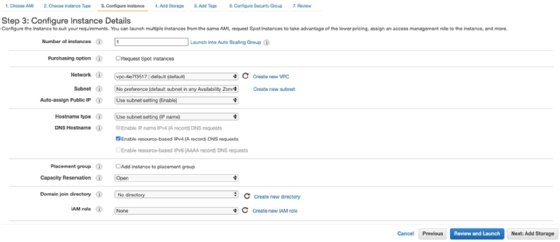
Step 7. Configure network settings and security groups
The next step is configuring network settings, such as Virtual Private Cloud, subnets, public IP assignment, DNS configuration and security groups. These configurations determine network assignment and accessibility for the newly created instance.
Security groups in AWS determine a set of access rules for both incoming and outgoing traffic in the EC2 instance. The settings include port ranges, IPs or security group IDs assigned to resources trying to access an EC2 instance. Limit incoming traffic to only the set of parameters strictly required to access an EC2 instance. Avoid generic rules that allow open access to a wide range of ports and IP addresses.
Select either an existing security group or create a new one.
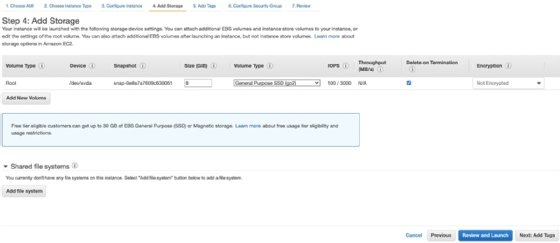
Step 8. Configure storage
Most EC2 instances attach to an EBS volume, which is configured in this section. Specify the storage size in gigabytes and the storage type options. Options include various generations of general-purpose SSD or provisioned IOPS as well as older-generation magnetic volumes, but these are not recommended. Storage-optimized instance types, such as EC2 c5d, come with built-in SSD storage.
Users can also choose a shared file system powered by the EFS service.
After selecting the storage type, move to the Advanced Details section. This section includes the following:
- Domain directory to join a directory.
- Permissions.
- Auto-recovery.
- Shutdown behavior.
- Termination and stop protection.
- Detailed monitoring in one- or five-minute intervals.
- Optional Spot Instances.
- Tenancy.
- User data.
- Parameters related to the number of instances to launch.

Even though the AWS Console offers an intuitive way to launch EC2 instances, AWS users must do a lot of manual work. For that reason, many prefer a different interface in the long term. This is particularly true for situations where they will launch multiple EC2 instances over time.
Other ways include the AWS Command Line Interface or services like AWS CloudFormation for infrastructure as code. These methods apply automation, standardization and repeatability to EC2 instance creation. There is minimal to no manual intervention.
Ernesto Marquez is the owner and project director at Concurrency Labs, where he helps startups launch and grow their applications on AWS. He enjoys building serverless architectures, building data analytics solutions, implementing automation and helping customers cut their AWS costs.